上一篇相关博文,准备阶段OpenMV学习笔记链接:https://sublimerui.top/archives/f10b0e1a.html
无人机题目分析
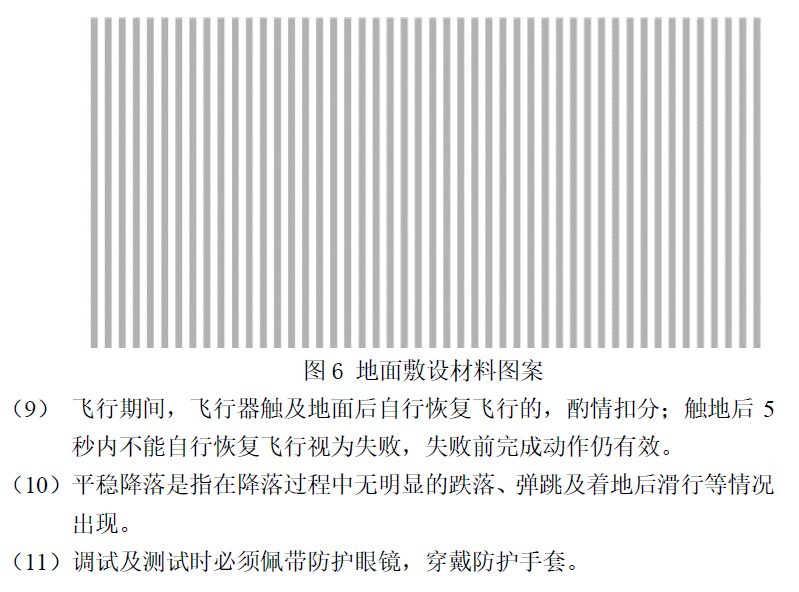
今年的电赛题目着实让人觉得出题挺新颖的。新颖的同时,困难度就直线提升了(呜呜呜,我们队就是受害者之一,说好的光流可以定点呢,结果那种灰白条纹地面根本就定不住,真的想狠狠地吐槽一下砖家组)
哎,做下来大部分时间懵逼,都是一把辛酸一把泪呀~
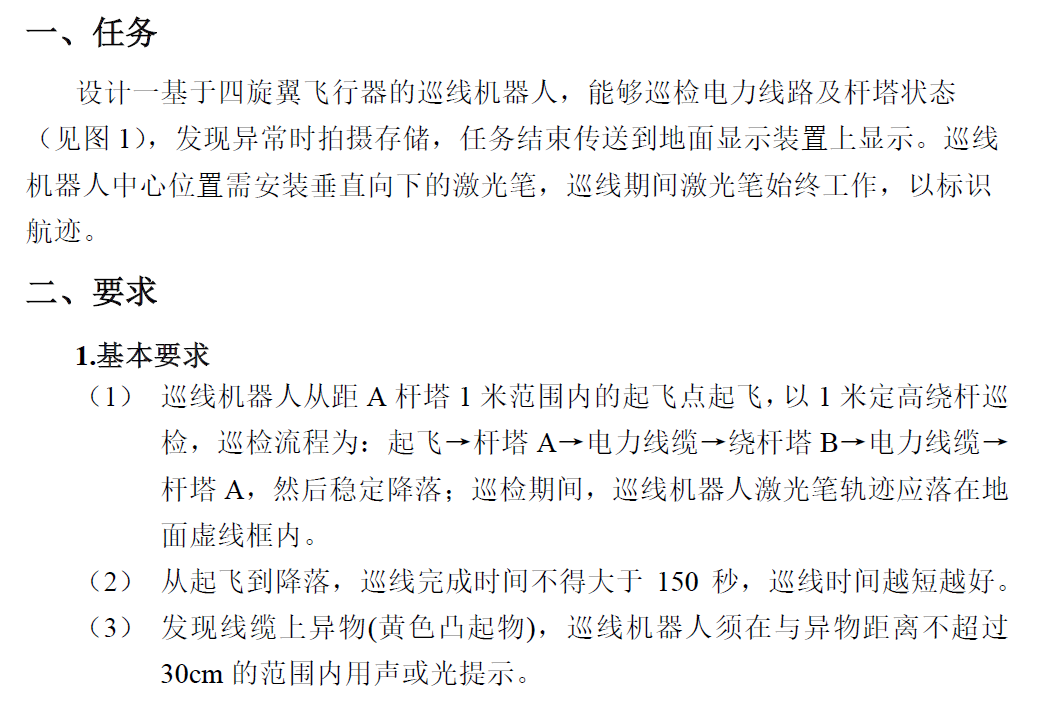
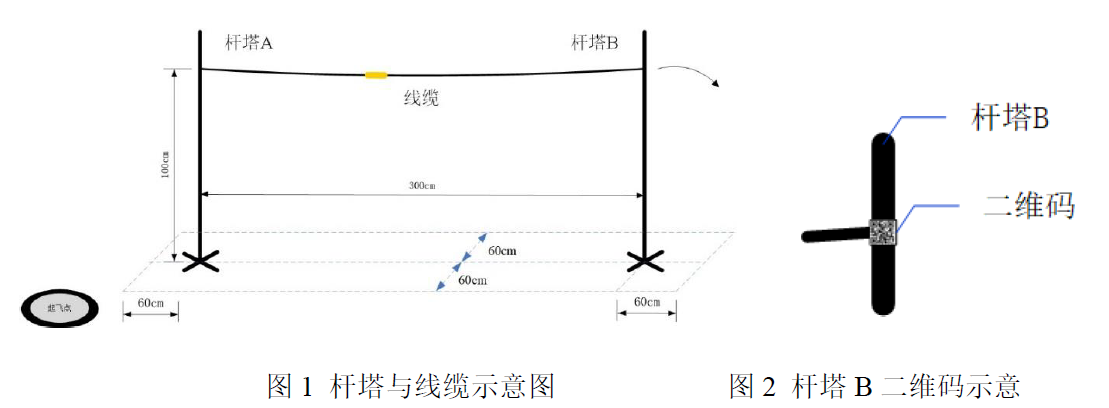
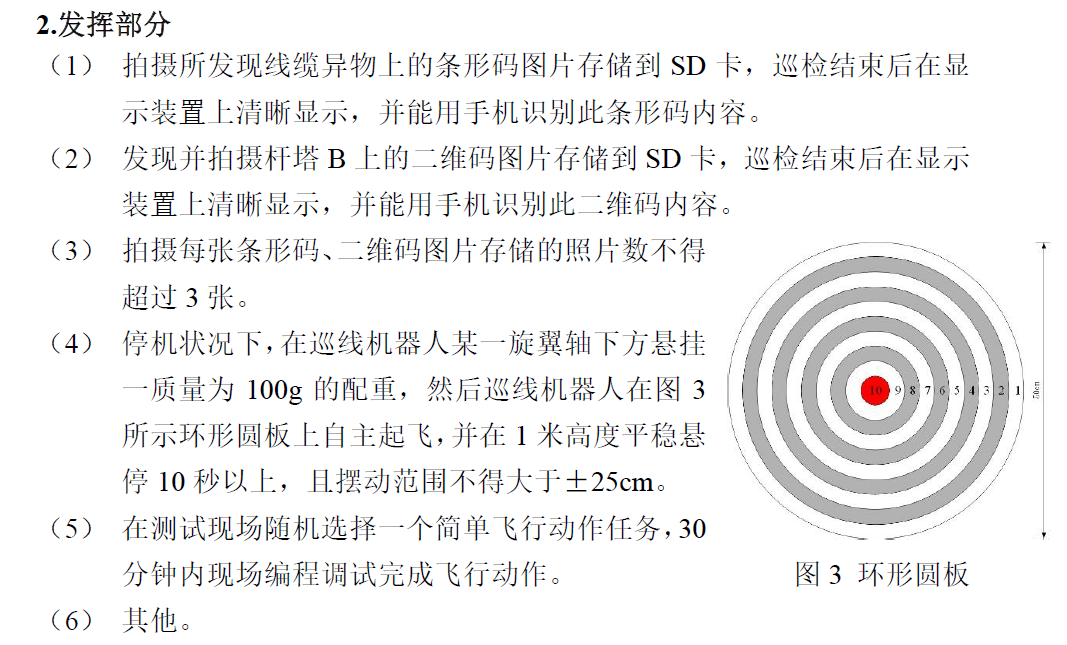
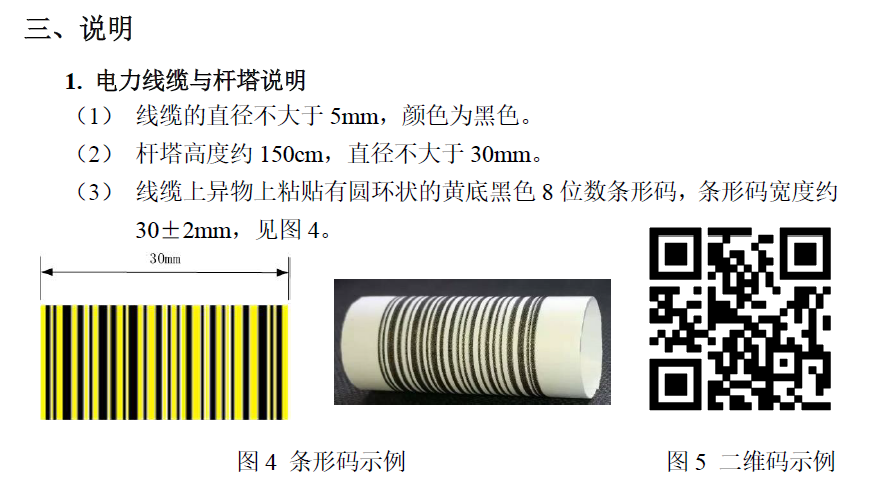
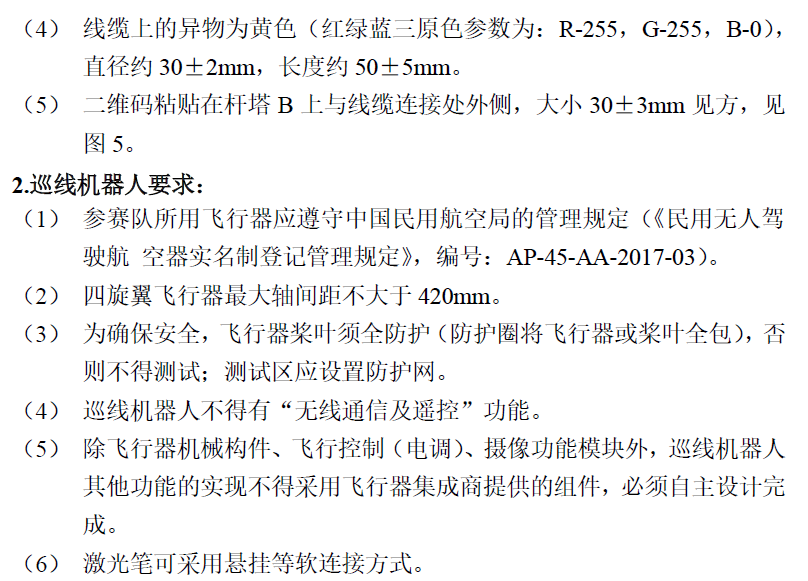
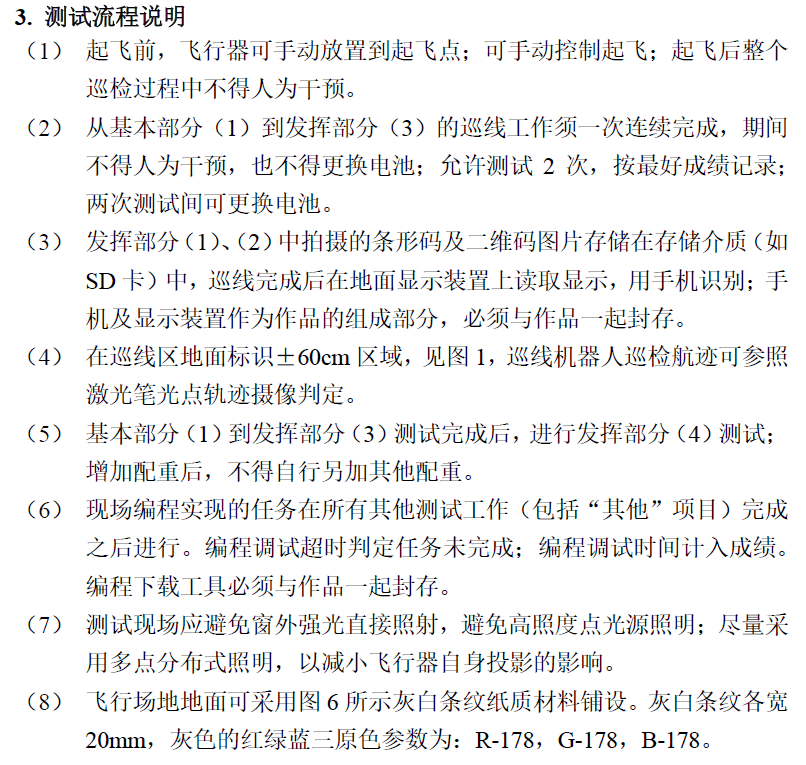
言归正传,今年的电赛无人机题目B题——巡线机器人,具体要求是让我们的无人机从一个杆起飞,沿着线飞向宁一个杆,飞行过程中会拍摄条形码和二维码,绕杆一圈后,再降落。题目如下:
PS:这里附上2019年电赛的各方向题目,已经放在Github上:2019电赛题目.zip
分类
题目中,涉及OpenMV的部分,主要可以分为以下几类吧:
- 识别并拍摄条形码和二维码,储存于SD卡中;
OpenMV巡线(此方法是由于实际比赛中发现无法用光流在灰白条纹地面上定点,即无法控制其水平方向的误差偏移)
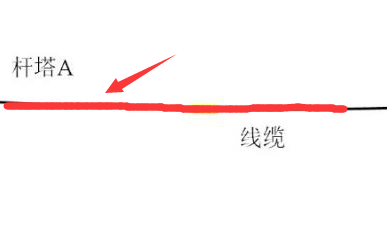
- 方法一:识别并拟合两条杆之间线缆的直线,返回偏差距离和偏差角度(缺点:OpenMV视野横向不丢失距离太小了);
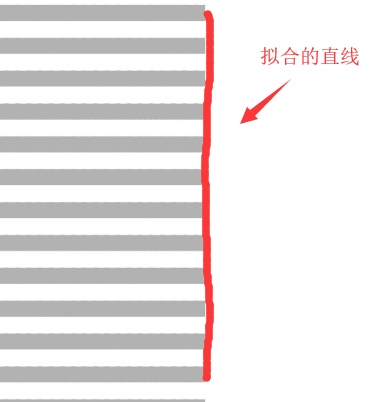
- 方法二:拟合识别条纹边缘(由于条纹宽度规定了,可以寻找灰白条纹和外部白色地面的交界处),拟合出边缘直线,返回偏差距离和偏差角度(相对来说更稳定,这也是我们队最后用的方法);
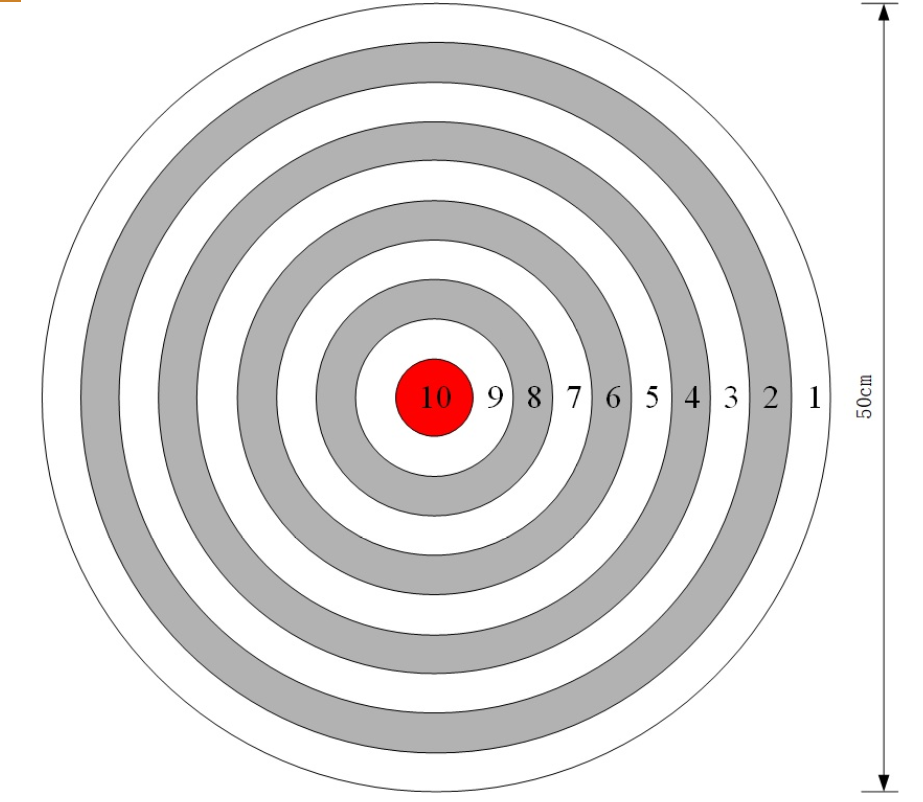
- 识别并返回环形圆板中心红点坐标位置,使飞机定圆点(发挥部分)
- 其他(例如起飞后用OpenMV识别靠杆,识别到特定标志后开始绕杆等等)
逐类型分析
拍摄条形码和二维码并储存SD卡
有关于条形码和二维码的讲解我已将在上一篇博文中有所总结和归纳了,这里,直接贴上我写的部分代码吧,全部代码已经放在我的Github上面了,需要的话可以自己下载呐~
自己手写的完整程序已放在Github上:shot_images_to_save.py
- 条形码和二维码拍摄:
函数shot_images_while_tracking_lines()用于拍摄并储存找 照片于SD卡中。其中,此段程序会分别对条形码连续循环拍3三张,分别命名为“barcod_1.jpg”,“barcod_2.jpg”和“barcod_3.jpg”(二维码同理),只要OpenMV插上了SD卡后,一旦识别到相关条码后,便会拍摄并自动保存到卡中。
完整程序代码中,如果识别到条形码,OpenMV就会闪绿灯拍照;识别到二维码后,OpenMV会闪红灯拍照。
############ 拍照 ###############

barcode_num = 0
qrcode_num = 0

# 拍摄照片
def shot_images_while_tracking_lines():
    #global had_finished_barcode, had_finished_qrcode
    global barcode_detected, qrcode_detected, barcode_num, qrcode_num

    if barcode_detected: #and (not had_finished_barcode):
        #sensor.set_framesize(sensor.QVGA)
        #barcode_detected = 0

        if barcode_num <= 3:
            barcode_num += 1
            barcode_name = "barcode_" + str(barcode_num)
            sensor.snapshot().save(barcode_name + ".jpg")

            print(barcode_name + ".jpg is saved!")
            time.sleep(5)


            if barcode_num >= 3:
                barcode_num = 0
                #barcode_detected = 0
                print("bar:", barcode_detected)
                #had_finished_barcode = 1
                return True

    if qrcode_detected: #and (not had_finished_qrcode):
        #sensor.set_framesize(sensor.QVGA)
        #qrcode_detected = 0

        if qrcode_num <= 4:
            qrcode_num += 1
            qrcode_name = "qrcode_" + str(qrcode_num)
            sensor.snapshot().save(qrcode_name + ".jpg")

            print(qrcode_name + ".jpg is saved!")
            time.sleep(5)

            if qrcode_num >= 3:
                qrcode_num = 0
                #qrcode_detected = 0
                print("qr:", qrcode_detected)
                #had_finished_qrcode = 1
return True- 识别条形码(识别黄色)和二维码(二值化后计算像素点,设置阈值):
此段程序中,函数count_pixels_with_movement(img)用于识别并判断识别条形码和二维码的条件和阈值。以条形码为例,这里通过色块识别的方法,调用img.find_blobs()函数,通过设置黄色阈值,达到识别到黄色条码的目的。其中,barcode_pixels_threshold是一个列表,储存的2个元素分别是黄色阈值下限和上限。
此外,我也尝试运用统计像素点的方式去识别二维码和条形码(这里已经被注释掉),其方法是先将图像按照一定的阈值二值化后,调用img.get_pixel()函数,统计满足像素值为255(即白色)的像素个数,同时,设定特定的像素阈值(如qrcode_pixels_threshold等等,与黄色检测同理,也有阈值上下限两个阈值),也可以达到同样的效果。
############ 像素识别 ###########

barcode_cnt = 0
qrcode_cnt = 0
pole_cnt = 0
LED_ON = 0

def count_pixels_with_movement(img):
    global x_width, y_height
    global barcode_detected, qrcode_detected
    global barcode_cnt, qrcode_cnt, pole_cnt
    global LED_ON

    blob = img.find_blobs(barcode_pixels_threshold, pixels_threshold=150, area_threshold=150, merge=True, margin=5)
    if blob:
        pass
        for i in blob:
            img.draw_rectangle(i.rect(), color = 127)
            barcode_detected = 1
            LED_ON = 1
            print("132123132131313131112311231") #测试用,可删除
            print("aaaaaaaaaaaaaaaaaaaaaaaaaaaa")
            return
    else:
        barcode_detected = 0
        LED_ON = 0
        return
    x_pos = 0
    y_pos = 0
    total_white_pixels = 0
    for x_pos in range(x_width):
        for y_pos in range(y_height):
            if img.get_pixel(x_pos, y_pos) == 255:
                total_white_pixels += 1

    #print("total white pixels are", total_white_pixels)
#    if total_white_pixels >= verticle_pixels_threshold[0] and \
#            total_white_pixels <= verticle_pixels_threshold[1]:       #直角
#        singleline_check.is_verticle = 2

#    elif total_white_pixels >= track_line_pixels_threshold[0] and \
#            total_white_pixels <= track_line_pixels_threshold[1]:     #巡线
#        singleline_check.is_verticle = 1

    if total_white_pixels >= barcode_pixels_threshold[0] and \
            total_white_pixels <= barcode_pixels_threshold[1]:        #条形码
       if barcode_cnt >= 0 and barcode_cnt <= 49:
            barcode_cnt += 1
       if barcode_cnt == 50:
            barcode_cnt = -1
            barcode_detected = 1

    #        LED(1).toggle()  #红灯
    #        time.sleep(200)
    #        LED(1).toggle()

    #if total_white_pixels >= qrcode_pixels_threshold[0] and \
    #        total_white_pixels <= qrcode_pixels_threshold[1]:         #二维码
    #    if qrcode_cnt >= 0 and qrcode_cnt <= 49:
    #        qrcode_cnt += 1
    #    if qrcode_cnt == 50:
    #        qrcode_cnt = -1
    #        qrcode_detected = 1

    #        LED(3).toggle()   #蓝灯
    #        time.sleep(200)
    #        LED(3).toggle()

    #elif total_white_pixels >= near_the_pole_threshold[0] and \
    #        total_white_pixels <= near_the_pole_threshold[1]:         #到达杆
    #    if pole_cnt >= 0 and pole_cnt <= 49:
    #        pole_cnt += 1
    #    if pole_cnt == 50:
    #        pole_cnt = -1
    #        send_flag.pole_is_near = 1

    print("the flags are: %d %d %d"%(barcode_detected, qrcode_detected, send_flag.pole_is_near))   #测试用,可删除
OpenMV巡线
自己手写的完整程序已放在Github上:detect_and_track_edges.py
方法一(拟合两杆间直线)
巡线的时候,使用的是最小二乘法的线性回归算法,即运用img.get_regression()函数(这里打开了鲁棒算法robust = True,效果更好),计算其拟合直线后的结果,并拥有两个返回值(误差偏离值singleline_check.flag2.rho()和偏角值singleline_check.flag2.theta())
#找线
def found_line(img):
    #对图像所有阈值像素进行线性回归计算。这一计算通过最小二乘法进行,通常速度较快,但不能处理任何异常值。 若 robust 为True,则将
    #使用泰尔指数。泰尔指数计算图像中所有阈值像素间的所有斜率的中值。thresholds:追踪的颜色范围
    singleline_check.flag2 = img.get_regression([(255,255)], robust = True)
    if (singleline_check.flag2):
        #print(clock.fps())
        singleline_check.rho_err = abs(singleline_check.flag2.rho())-0 #求解线段偏移量的绝对值
        if singleline_check.flag2.theta()>90: #求解角度的偏移量
            singleline_check.theta_err = singleline_check.flag2.theta()-0
        else:
            singleline_check.theta_err = singleline_check.flag2.theta()-0
        #在图像中画一条直线。singleline_check.flag2.line()意思是(x0, y0)到(x1, y1)的直线;颜色可以是灰度值(0-255),或者是彩色值
        #(r, g, b)的tupple,默认是白色
        img.draw_line(singleline_check.flag2.line(), color = 127)
        #print(singleline_check.theta_err)
拟合示意图如下,(其中,红色的为拟合直线):
PS:此方法准确度较高,但是OpenMV图像视野范围有限。当直线从图像视野最下端到达最上端,换算成无人机横向移动的距离仅有5-10cm,当无人机超出此范围时,将无法获取直线了,有一定的局限性。
方法二(拟合识别条纹边缘)
此函数track_edges(img)中,同样使用img.find_blobs()找色块的方法,其中运用了简单角度和距离的计算方法。并返回条纹底色边界线的拟合直线,此函数的计算结果为拟合直线距离画面左边界距离rho和中心线的偏离角度theta。
def track_edges(img): #invert = True
    blobs = img.find_blobs([edge_thresholds], pixels_threshold=50, area_threshold=50, merge=False, margin=5)
    if blobs:
        sum_x = 0
        sum_theta = 0
        for i in range(len(blobs)):
            img.draw_rectangle(blobs[i].rect(), color = 127)
            sum_x += (blobs[i].x() + blobs[i].w())
            sum_theta += math.degrees(blobs[i].rotation())

        per_x = sum_x / len(blobs)
        per_y = y_height / 2
        per_theta = sum_theta / len(blobs)

        if per_theta >= 0 and per_theta < 90:
            true_theta = 90 - per_theta

        elif per_theta >= 90 and per_theta <180:
            true_theta = (180 - per_theta) + 90

        print("per_x: %d per_y: %d true_theta: %d"%(per_x, per_y, true_theta))
        horizontal_line = (int(per_x), int(per_y), 0, int(per_y))
        centre_cross    = (int(per_x), int(per_y))

        img.draw_line(horizontal_line, color = 127)
        img.draw_cross(centre_cross, color = 127)

        singleline_check.rho_err = int(per_x)
        singleline_check.theta_err = int(true_theta)

    line.flag = 1
    uart.write(pack_linetrack_data())
拟合示意图如下(其中,红色的为拟合直线):
这样,当检测到条纹边界的时候,会计算拟合出条纹边界的直线。
PS:注意,使用这种方法一定要打开白平衡和自动增益!!!非常重要!!!我们队就吃了这样的亏,使得OpenMV距离地面较近的时候识别正常,一旦远离地面一定距离后,图像中将无法识别边界直线!!!
#在这里,应该将自动增益和白平衡打开
sensor.set_auto_gain(True)
sensor.set_auto_whitebal(True)
飞机悬停定圆点
定特定颜色的原点时,将运用img.find_blobs()函数(这里将图像二值化了),返回色块其中心坐标cx()和cy()即可。对于不同的颜色的色块(如题目中的红色),需要实地测试得到不同的阈值。
这里的返回值为圆点中心坐标、像素大小和标志位。
自己手写的完整程序已放在Github上:main.py
找圆点函数:
# 点检测函数
def check_dot(img):
    #thresholds为黑色物体颜色的阈值,是一个元组,需要用括号[ ]括起来可以根据不同的颜色阈值更改;pixels_threshold 像素个数阈值,
    #如果色块像素数量小于这个值,会被过滤掉area_threshold 面积阈值,如果色块被框起来的面积小于这个值,会被过滤掉;merge 合并,如果
    #设置为True,那么合并所有重叠的blob为一个;margin 边界,如果设置为5,那么两个blobs如果间距5一个像素点,也会被合并。
    for blob in img.find_blobs(thresholds, pixels_threshold=80, area_threshold=80, merge=True, margin=5):
        if dot.pixels<blob.pixels():#寻找最大的黑点
            ##先对图像进行分割,二值化,将在阈值内的区域变为白色,阈值外区域变为黑色
            img.binary(thresholds)
            #对图像边缘进行侵蚀,侵蚀函数erode(size, threshold=Auto),size为kernal的大小,去除边缘相邻处多余的点。threshold用
            #来设置去除相邻点的个数,threshold数值越大,被侵蚀掉的边缘点越多,边缘旁边白色杂点少;数值越小,被侵蚀掉的边缘点越少,边缘
            #旁边的白色杂点越多。
            img.erode(2)
            dot.pixels=blob.pixels() #将像素值赋值给dot.pixels
            dot.x = blob.cx() #将识别到的物体的中心点x坐标赋值给dot.x
            dot.y = blob.cy() #将识别到的物体的中心点x坐标赋值给dot.x
            dot.ok= 1
            #在图像中画一个十字;x,y是坐标;size是两侧的尺寸;color可根据自己的喜好设置
            img.draw_cross(dot.x, dot.y, color=127, size = 10)
            #在图像中画一个圆;x,y是坐标;5是圆的半径;color可根据自己的喜好设置
            img.draw_circle(dot.x, dot.y, 5, color = 127)

            print("centre_x = %d, centre_y = %d"%(dot.x, dot.y))

    #判断标志位 赋值像素点数据
    dot.flag = dot.ok
    dot.num = dot.pixels

    #清零标志位
    dot.pixels = 0
    dot.ok = 0
剩下的其他功能自己就没有写啦(T_T),比赛四天太紧张了,这样已经很不错了,已经是全部成果~
感谢你的耐心阅读呀(๑◡๑),原创总结不易,收藏并评论一下呗~
你的支持就是我前进的动力呀~
寻找华纳圣淘沙公司开户代理(183-8890-9465薇-STS5099】
华纳圣淘沙官方合作开户渠道(183-8890-9465薇-STS5099】
华纳圣淘沙公司开户代理服务(183-8890-9465薇-STS5099】
华纳圣淘沙公司开户咨询热线(183-8890-9465薇-STS5099】
联系客服了解华纳圣淘沙开户
(183-8890-9465薇-STS5099】
华纳圣淘沙公司开户专属顾问
(183-8890-9465薇-STS5099】